Alright, this may not be the most swoon-worthy or glamorous of posts, but it's the new year and since many people (including yours truly) resolve to spend less and save more in 2011, it's pretty apropos. What am I talking about? Clipping coupons. I'm sure half the people reading just groaned. I don't blame you. But over a year ago when I saw someone on Oprah who saved tons of money each week simply by using coupons, I was intrigued. A year+ later, clipping coupons is just part of my weekly shopping routine, and I average a savings of about $20 per week just in coupons alone. Here's the deal:
First thing's first: you'll need to get a weekly newspaper that has the coupon circulars - there are (at least in my area) two circulars: Smart Source and Red Plum. These are enclosed in the weekend paper each week (though, sometimes Red Plum is thrown in the weekly grocery store circulars that come in your mailbox - make sure to check!). Second, stop clipping. Don't waste your time. Instead, when the coupon circulars come, date the tops and put them in a folder, like so:
As you can see above, I date each of my circulars at the top and then file in my folder in chron order. Every few months I'll take a look at the earliest circular and see if any of the coupons are still good. If they're expired, the pack gets recycled. Sometimes there are more than one circular each week, so I note that at the top too (as above, I've put Jan. 2: 1/2 and Jan 2: 2/2, so I know that there are two circulars that week).
Next step is to grab your grocery store's weekly circular. Some people will look through all the local groceries' circulars and figure out where to shop based on who has the best deals. I am not one of those people: I am loyal to my local Acme Market so I grab that circular and look through it. I carefully review the circular and circle the things that are a good deal and that I need or want. Once I have done that, I can search my coupons. [Note: you should sign up for your grocery store's reward or coupon program and find out your store's double coupon policy. My store will double any manufacturer's coupon up to $1.00, so if I find a coupon for, say, $.75 on butter, it amounts to a $1.50 coupon. My parents' store in NJ doubles up to $1.50! nice.]
I love Coupon Mom's grocery store database. She is the woman I saw on Oprah who explained the coupon system. The goal is to buy something that's on sale and use a coupon. So I hit up the Coupon Mom website and search for the things I've circled in the Acme circular. Sometimes there are spelling errors, so it's best to try a few variations if you can. In other words, rather than search for "land-o-lakes butter" search for "butter" or "land" or "lake." I also throw in a search for "free" to see if there are any freebies available, which there often are. Each week, Coupon Mom updates her database with the new coupons and will remove any that are expired. If there is an active coupon for the item that you've searched for, the website will tell you where to find it,by noting the date of the coupon circular and whether it is Smart Source (S) or Red Plum (RP). There are also General Mills and Proctor & Gamble circulars from time-to-time, and she has these on her site, too. Once I find the coupons I need and then cut them out, organize according to the aisles in the store and I'm done! It takes a little time and planning, don't get me wrong. But to me, saving upwards of $20 per week makes up for that.
It may take a few tries to get into a good rhythm and once you do, it can be kind of fun to see how much money you can save. Sometimes when the stars align and I save a ton and have a super thick stack of coupons, I want to ask the clerk to announce how much I saved over the loud speaker. Dork. Good luck and happy savings to you! Are you a coupon clipper? Or does the cheese stand alone on this one?
See you swoon,
{grocery cart picture found here}
What Would Jamie Wear: Scarves
I never used to wear scarves or really care about them all that much but I have found myself over the past few years collecting one here and there and now they are taking over my closet! They are a great accessory and can add a little glam or warmth to any outfit (as long as it's not 90 degrees outside!)
Here are a few that I would love to add to my collection, what is your favorite go to accessory?
Fossil: Adele Fur Trimmed Scarf

White House Black Market: Ruffle Scarf

Madewell Pintuck Pyramids Scarf:
J Crew: Cashmere Scarf ( We all need one of these, I mean come on, wrap me up in this thing and call it a day).
For all of you in colder climates trying to stay warm like Shanna and me, good luck, oh and keep your fingers crossed that the weather forecast for snow this weekend is WRONG so that we can still make the trek to the Pottery Barn outlet (you do not want to know what happens if we do not make it there this weekend!).
See you swoon,
Here are a few that I would love to add to my collection, what is your favorite go to accessory?
Fossil: Adele Fur Trimmed Scarf
White House Black Market: Ruffle Scarf

Madewell Pintuck Pyramids Scarf:
J Crew: Cashmere Scarf ( We all need one of these, I mean come on, wrap me up in this thing and call it a day).
For all of you in colder climates trying to stay warm like Shanna and me, good luck, oh and keep your fingers crossed that the weather forecast for snow this weekend is WRONG so that we can still make the trek to the Pottery Barn outlet (you do not want to know what happens if we do not make it there this weekend!).
See you swoon,
Toy Story-age (er ... storage): My Basement Playroom
Seriously. The toys take over and they take over fast. I am so lucky that we have a home with a finished basement, which started out as our den, and gradually, ever so slowly, the play space took over the chill space and now it is a fully-devoted playroom for the kids. This room saves our sanity, especially in the Winter months. But being the somewhat totally OCD person that I am, I couldn't bear to have the room just stuffed with toys. I've always tried to make the room organized, functional and fun for the kids ... and also a place that we are A-OK spending a few hours in each day. I don't really have any "before" pictures of the space, but here is my basement playroom now - and yes, the new toys from Christmas have homes and are already neatly tucked away until Hurricane Big and Cyclone Little tear into the room next weekend.
The secret to keeping the space neat and tidy are the super cute (and super cheap) Cubeicals (by Closetmaid) and fabric drawers, all of which I purchased at wait for it ... wait for it ... Target. I also have a few baskets from Ikea along the one side and some open cubes, so that the entire thing isn't filled with the red drawers.
I took a few minutes before putting together the Cubeicals and put some cute patterned contact paper on the backs of the unit, just for a little pop of color and fun. I created my own DIY chalkboard labels for the fabric drawers based on these from Pottery Barn Kids that I fell in love with, but refused to pay $50 for and opted to pay about $7 for instead (not to worry: I will have a tutorial in an upcoming blog post).
My kids love their train table and little kitchen. I love that the kitchen is absolutely adorable and small in scale, not to mention made of wood so I can add some hooks to it for their accessories. The train table has two nice sized drawers for extra trains and tracks. I've hung some inexpensive shelves on the wall from Ikea that store larger toys that won't really fit anywhere else. I keep these to one toy per shelf and it ends up looking kind of like a toy store.
The toy box holds the kids' dress-up clothes, and the baby area is right here too. I plan to paint the baby bed (also from Ikea) white with pink polka-dots in the Spring while I am painting my dining room furniture, since I'll have the primer & white paint already working.
I found this small-scale table and chairs from Ikea. In retrospect, a white table was probably not the brightest idea for a children's art table, but I guess the crayon marks just add character. For the art supplies, I bought the little set of knob-hooks at Ikea and found the pails in Target's Dollar Spot around Valentine's Day (hence the heart cut-out). Crayons and waterproof markers live in the pails. I again modeled the idea after one I saw in Pottery Barn Kids, but mine cost about $5 versus the Pottery Barn Kids $30 plus shipping. Woot.
The art over the table couldn't be simpler: it is a cheap ($5) bulletin board for each kid with his/her artwork tacked up. I found the hanging black frames in the Target Dollar Spot and simply framed each of their initials, to create a mini art-gallery for each babe. It is so easy to switch out art and this helps answer the question of what to do with all that artwork that your child brings home from school.
I found this corner armoire on Craigslist a few years ago. It's great for what we need and was a steal at $40. We have the TV for us and for workout DVDs when the kids are in bed. I bought the red bins on the bottom at Ikea and we store coloring books in them. The top basket (from Pottery Barn about 10 years ago) keeps a few small items out of view. Those silver mesh containers to the right are actually laundry baskets from Ikea. I use them to hold the kids' big cardboard bricks that the kids love but that take up so much space (and anyone my age will probably say OMG! I totally had those bricks!)
Finally, this is the grown-up chair and ottoman. The chair is an Ikea Tullsta chair, which I found on Craigslist for about $30. The ottoman is an old faux leather ottoman from Target that the cat destroyed, but my sweet friend Liz made the adorable ottoman cover for me. I bought a couple of inexpensive pillows at Ikea to match the transformed ottoman. My DIY copy cat Pottery Barn Typography art hangs on the wall here. As you can see, I carried the Cubical storage and fabric drawers to this side of the room too. What can I say - we now have cars-trucks-trains and dolls-dollhouses-Barbies in one space. So far, they peacefully coexist.
There you have it! If you have any toy organization quandaries, please pass them our way. We *love* to organize! I'll close this post with a Sesame Street-esque ending: this playroom brought to you today by the stores Target and Ikea and the website Craigslist. Ha.
See you swoon,
The secret to keeping the space neat and tidy are the super cute (and super cheap) Cubeicals (by Closetmaid) and fabric drawers, all of which I purchased at wait for it ... wait for it ... Target. I also have a few baskets from Ikea along the one side and some open cubes, so that the entire thing isn't filled with the red drawers.
I took a few minutes before putting together the Cubeicals and put some cute patterned contact paper on the backs of the unit, just for a little pop of color and fun. I created my own DIY chalkboard labels for the fabric drawers based on these from Pottery Barn Kids that I fell in love with, but refused to pay $50 for and opted to pay about $7 for instead (not to worry: I will have a tutorial in an upcoming blog post).
My kids love their train table and little kitchen. I love that the kitchen is absolutely adorable and small in scale, not to mention made of wood so I can add some hooks to it for their accessories. The train table has two nice sized drawers for extra trains and tracks. I've hung some inexpensive shelves on the wall from Ikea that store larger toys that won't really fit anywhere else. I keep these to one toy per shelf and it ends up looking kind of like a toy store.
The toy box holds the kids' dress-up clothes, and the baby area is right here too. I plan to paint the baby bed (also from Ikea) white with pink polka-dots in the Spring while I am painting my dining room furniture, since I'll have the primer & white paint already working.
I found this small-scale table and chairs from Ikea. In retrospect, a white table was probably not the brightest idea for a children's art table, but I guess the crayon marks just add character. For the art supplies, I bought the little set of knob-hooks at Ikea and found the pails in Target's Dollar Spot around Valentine's Day (hence the heart cut-out). Crayons and waterproof markers live in the pails. I again modeled the idea after one I saw in Pottery Barn Kids, but mine cost about $5 versus the Pottery Barn Kids $30 plus shipping. Woot.
The art over the table couldn't be simpler: it is a cheap ($5) bulletin board for each kid with his/her artwork tacked up. I found the hanging black frames in the Target Dollar Spot and simply framed each of their initials, to create a mini art-gallery for each babe. It is so easy to switch out art and this helps answer the question of what to do with all that artwork that your child brings home from school.
I found this corner armoire on Craigslist a few years ago. It's great for what we need and was a steal at $40. We have the TV for us and for workout DVDs when the kids are in bed. I bought the red bins on the bottom at Ikea and we store coloring books in them. The top basket (from Pottery Barn about 10 years ago) keeps a few small items out of view. Those silver mesh containers to the right are actually laundry baskets from Ikea. I use them to hold the kids' big cardboard bricks that the kids love but that take up so much space (and anyone my age will probably say OMG! I totally had those bricks!)
Finally, this is the grown-up chair and ottoman. The chair is an Ikea Tullsta chair, which I found on Craigslist for about $30. The ottoman is an old faux leather ottoman from Target that the cat destroyed, but my sweet friend Liz made the adorable ottoman cover for me. I bought a couple of inexpensive pillows at Ikea to match the transformed ottoman. My DIY copy cat Pottery Barn Typography art hangs on the wall here. As you can see, I carried the Cubical storage and fabric drawers to this side of the room too. What can I say - we now have cars-trucks-trains and dolls-dollhouses-Barbies in one space. So far, they peacefully coexist.
There you have it! If you have any toy organization quandaries, please pass them our way. We *love* to organize! I'll close this post with a Sesame Street-esque ending: this playroom brought to you today by the stores Target and Ikea and the website Craigslist. Ha.
See you swoon,
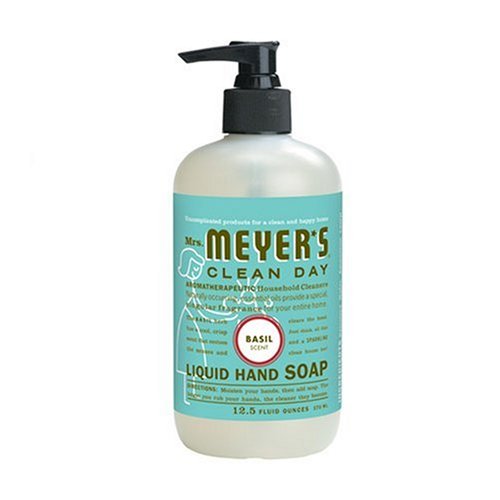
Swoon-Worthy Find: Mrs. Myers Clean Day
New Year equals a clean house, home, and body. I am completely in love with Mrs. Myers home and personal products, specifically her basil scented hand soap.

You cannot go wrong really with any of the wonderful scents that they have created but this one really just makes me want to sniff my hands all day! I will admit, some of the items are a little more expensive than the usual products I purchase but I may have to try a few more just to add a bit more of this basil scent into my life.
Check out www.mrsmeyers.com to see all the different products they are currently offering. The best part about these products is that they are earth-friendly, cruelty free and do not test on animals which they talk about right in the about us section. I also have a huge sweet spot for the older generation so it makes me happy that this brand was inspired by the sweet Thelma A. Meyer and created by her daughter to eliminate harsh chemicals and add a beautiful aromat to household products that we can all enjoy (especially if cleaning is not one of your favorite activities).
If you get a chance to check out this brand, let me know what you think. If you have a brand you are completely loyal to, let us know what it is and why!
See you swoon,

You cannot go wrong really with any of the wonderful scents that they have created but this one really just makes me want to sniff my hands all day! I will admit, some of the items are a little more expensive than the usual products I purchase but I may have to try a few more just to add a bit more of this basil scent into my life.
Check out www.mrsmeyers.com to see all the different products they are currently offering. The best part about these products is that they are earth-friendly, cruelty free and do not test on animals which they talk about right in the about us section. I also have a huge sweet spot for the older generation so it makes me happy that this brand was inspired by the sweet Thelma A. Meyer and created by her daughter to eliminate harsh chemicals and add a beautiful aromat to household products that we can all enjoy (especially if cleaning is not one of your favorite activities).
If you get a chance to check out this brand, let me know what you think. If you have a brand you are completely loyal to, let us know what it is and why!
See you swoon,
New Year-New Start-New January Challenge! {week 1}: cord control
Oh how I love the blank slate of a brand new year. Each year, I make my resolutions and also resolve that I will get, and stay, much more organized than the year before. This year is no different! In fact, this January, I am going to blog once a week about a quick and easy and (hopefully) inexpensive way to organize a trouble-spot in my home, complete with how much it cost.
Up today: taming the cords under the TV bookcase. Let me put on record how much I hate messy, exposed cords. So, I am totally embarrassed that it took me this long to address the tangled web of cords under my TV and the cords going from the power strip to the outlet. All it took was a little ingenuity and creativity and what was once an eyesore is now nice and neat and under control. I'll let the pictures do the talking.
Before - you can see my cords. Ugly. Embarrassing. Messy. (hangs head in shame)
Want a close up? OK, here you go.
After - woo hoo!!! Where are they cords? Where? Oh they're there. They are just neatly tucked away.
Here's what I did: I knew I had to organize a bunch of things under that bookcase: the powerstrip, the cords going in and out of the powerstrip, the modem and the router. I thought I had found the *perfect* solution from The Container Store, but when it arrived on my doorstep, holy moly cow, that sucker was huge. It was way too big for the teeny space under my bookshelf. Back to the store it went, and once again, I was in search of a solution. I ended up creating my own. I bought a cabinet shelf at Bed Bath and Beyond in their kitchen organization section for $5.00.
The problem? It was too tall. Again. RAR!
But the height was the only dimension that did not work and I loved everything else about this solution, since it was ventilated, had a shelf for the router and a place underneath for the modem and powerstrip. So I decided to try a Tim Gunn from Project Runway and "make it work." I just cut the legs down to size. I happen to have a saw for metal in my garage, so I measured each leg and then hacked off a few inches (apologies I don't have action shots of my sawing ... I did this solo and the cat isn't a very good photographer).
Yay! Success. Of course, the next wrinkle was that it was bright white, so as soon as I put it under the bookshelf, it kind of stuck out. I took a minute and used some black spray paint in my garage and sprayed that sucker black. Much better.
And here is the shelf doing its job very well, thank you! Ahhh ... calm from chaos.
But the job was not finished. I still had to contend with the cords going from the bookshelf to the outlet. I picked up one of those baseboard cable covers from the Home Depot. At $11.00, it was a little more than I wanted to spend, but I knew I needed a pretty thick cord cover since I had a bunch of cords in that space. I measured the space, cut the cord cover down to size and then popped the cords into their new home. I ended up having to do two strips, one on top of the other, but I think it looks fine.
And here is the after shot! So much better, no?
I am so happy that with a tiny bit of effort and about $16 ($5 for the cabinet shelf and $11 for the cord cover) my television bookcase went from a sorry state of affairs to a much tidier look. What about you? Got a cord conundrum? Let me know!
See you swoon,
Up today: taming the cords under the TV bookcase. Let me put on record how much I hate messy, exposed cords. So, I am totally embarrassed that it took me this long to address the tangled web of cords under my TV and the cords going from the power strip to the outlet. All it took was a little ingenuity and creativity and what was once an eyesore is now nice and neat and under control. I'll let the pictures do the talking.
Before - you can see my cords. Ugly. Embarrassing. Messy. (hangs head in shame)
Want a close up? OK, here you go.
After - woo hoo!!! Where are they cords? Where? Oh they're there. They are just neatly tucked away.
Here's what I did: I knew I had to organize a bunch of things under that bookcase: the powerstrip, the cords going in and out of the powerstrip, the modem and the router. I thought I had found the *perfect* solution from The Container Store, but when it arrived on my doorstep, holy moly cow, that sucker was huge. It was way too big for the teeny space under my bookshelf. Back to the store it went, and once again, I was in search of a solution. I ended up creating my own. I bought a cabinet shelf at Bed Bath and Beyond in their kitchen organization section for $5.00.
The problem? It was too tall. Again. RAR!
But the height was the only dimension that did not work and I loved everything else about this solution, since it was ventilated, had a shelf for the router and a place underneath for the modem and powerstrip. So I decided to try a Tim Gunn from Project Runway and "make it work." I just cut the legs down to size. I happen to have a saw for metal in my garage, so I measured each leg and then hacked off a few inches (apologies I don't have action shots of my sawing ... I did this solo and the cat isn't a very good photographer).
Yay! Success. Of course, the next wrinkle was that it was bright white, so as soon as I put it under the bookshelf, it kind of stuck out. I took a minute and used some black spray paint in my garage and sprayed that sucker black. Much better.
And here is the shelf doing its job very well, thank you! Ahhh ... calm from chaos.
But the job was not finished. I still had to contend with the cords going from the bookshelf to the outlet. I picked up one of those baseboard cable covers from the Home Depot. At $11.00, it was a little more than I wanted to spend, but I knew I needed a pretty thick cord cover since I had a bunch of cords in that space. I measured the space, cut the cord cover down to size and then popped the cords into their new home. I ended up having to do two strips, one on top of the other, but I think it looks fine.
And here is the after shot! So much better, no?
I am so happy that with a tiny bit of effort and about $16 ($5 for the cabinet shelf and $11 for the cord cover) my television bookcase went from a sorry state of affairs to a much tidier look. What about you? Got a cord conundrum? Let me know!
See you swoon,
Subscribe to:
Posts (Atom)